The authentication service is mainly used to obtain the token which will be used to stamp our CFDI (xml) already issued, In order to use this service, it is necessary that you have a username and a password to receive the token.
There are two different access tokens, temporary token and infinite token, the temporary token has a life time of two hours and the infinite does not expire unless it is revoked and it can be renewed.
Authenticate using API services
URL´s
https://services.test.sw.com.mx 📄
https://services.sw.com.mx 📄
🔗 Endpoint
| Method | Path |
|---|---|
| POST | /v2/security/authenticate |
🔐 Headers
| Header | Value |
|---|---|
| Content-Type | application/json |
🧾 JSON Parameters
| Property | Type | Use | Description |
|---|---|---|---|
| user | string | Required | |
| password | string | Required | Password |
Example Request
curl --location 'https://services.test.sw.com.mx/v2/security/authenticate' \
--header 'Content-Type: application/json' \
--data-raw '{
"user":" user@tests.com",
"password":"password1234"
}'
Example Response
{
  "data": {
    "token": "T2lYQ0t4L0RHVkR4dHZ5N....",
    "expires_in": 1684523799,
    "tokeny_type": "Bearer"
  },
  "status": "success"
}
{
    "message": "AU2000 - El usuario y/o contraseña son inválidos, no se puede autenticar el servicio.",
    "messageDetail": null,
    "data": null,
    "status": "error"
}
| Atributo | Tipo | Descripción |
|---|---|---|
| message | String | Code returned when an error occurs. |
| messageDetail | String | More descriptive error message when there is one. |
| data | object/null | Data object that includes the token to use the services. |
| status | String | “success” / “error” |
Authenticate using infinite Token
The infinite token of JWT type, unlike a token obtained through the authentication service, does not have an expiration date and will remain valid until it is revoked and a new token is generated.
To perform any of these processes, you must access the ADT (Stamp Administrator) portal with your credentials.
URL´s
https://portal.test.sw.com.mx 📄
https://portal.sw.com.mx 📄
Obtain Infinite Token
To obtain it, follow these two simple steps:
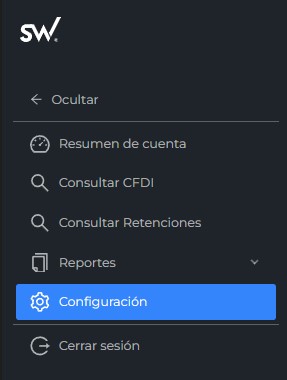
1.- Configuration.
In the left side panel of the ADT, select the “Configuración” option.
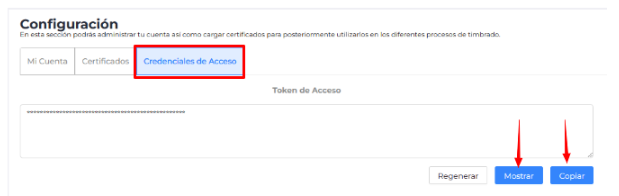
2.- Access Credentials.
Select the “Credenciales de Acceso” option, where you can “Show” the infinite token or copy it by clicking the “Copiar” button.
That’s it! You can use this token to authenticate and consume our APIs and stamping services.
Revoke and Regenerate Infinite Token
The infinite token can also be revoked if required, whether due to system updates, security policies, or changes in your business logic, by following these simple steps:
1.- Configuration.
In the left side panel of the ADT, select the “Configuración” option.
2.- Access Credentials.
Select the “Credenciales de Acceso” option, where you can “Show” the infinite token or copy it by clicking the “Copiar” button.
That’s it! You can use this token to authenticate and consume our APIs and stamping services.
3.- Regenerate.
Upon clicking this option “Regenerar”, the following message appears, and you must confirm to proceed with the revocation and regeneration of the token.
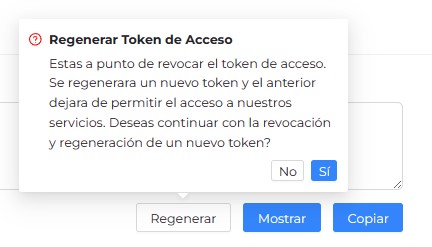
Warning: This process is irreversible; do not proceed unless strictly necessary.
After completing the process, the following confirmation message will appear.
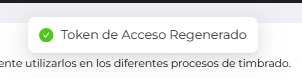
That’s it! The token will be revoked and a new one generated, which will revoke the previous one. Remember to replace the old token with the new one to continue consuming our APIs and stamping services.